5 Tips to Keep Windows 10 Laptop at High Performance
Top 5 Tips to Keep Windows 10 Laptop at High Performance
Nothing can be more frustrated than a sluggish computer, especially when you are playing games, or negotiating a business transaction. Have you ever noticed a significant difference on your laptop’s performance after enough time passed? As your laptop ages, the processing speed becomes slow-down. The CPU always overheats, and your laptop battery runs out fast without charging. There could be quite a few reasons affecting its performance. In this post you can find some useful ways to keep Windows 10 laptop at high performance.
I can’t promise your laptop will perform like a newly-bought computer following below methods, but you will be able to make your laptop to run at least a little, or maybe a lot, faster than before.
1. Switch to Laptop High Performance Power Plans
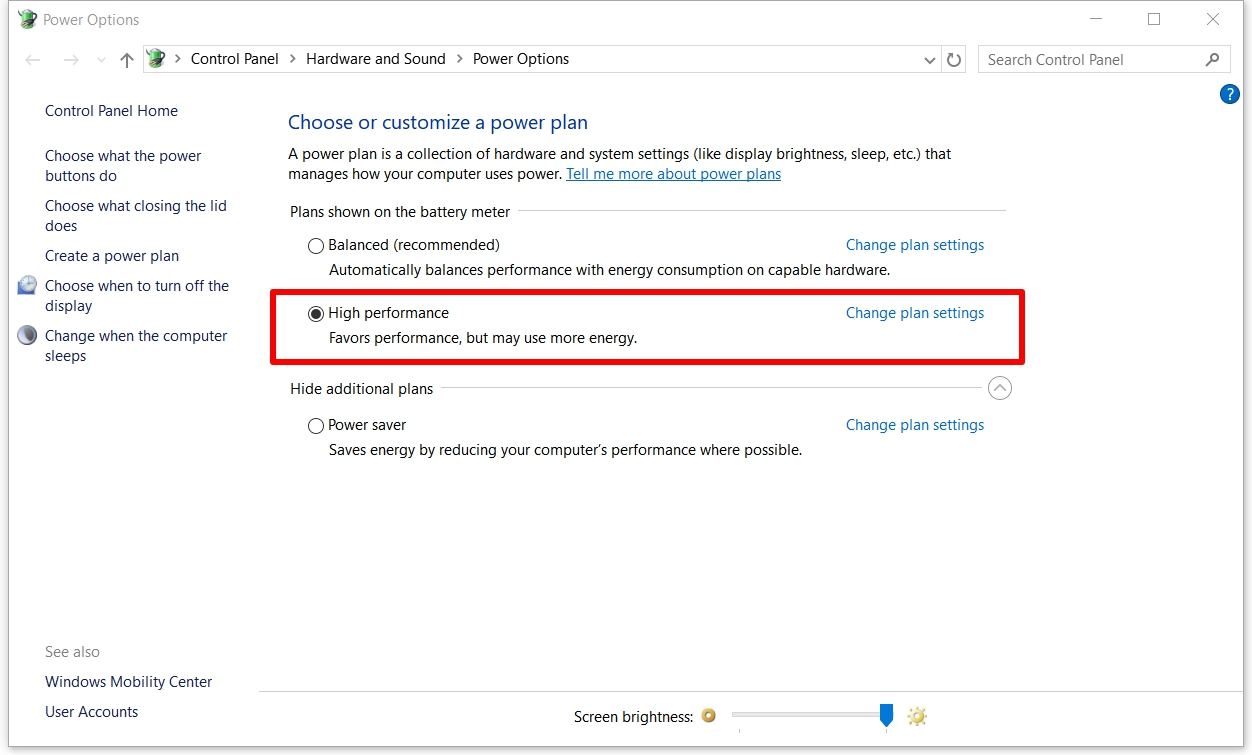
By default Windows operating system sets all laptops to the “Balanced” power plan. It will dynamically adjust CPU performance depending on the workload your laptop carries. Most of the time the Balanced plan works well with Windows 10, but in some case you may experience a degraded performance on your laptop. To work around this issue, you can change to the Window High Performance Mode with processor running its maximum speed all the time.
To Change the Power Plan on Windows 10 Laptop:
- 1. Right click the battery icon and choose Power Option. Or go to Control Panel > Hardware and Sound, under the list of displayed item click on Power Option.
- 2. Manually select preferred High Performance power plan on the menu. If it’s hidden click Show Additional Plans heading in the bottom.
2. Disable Windows 10 Startup Programs on Laptop
Change the power plan is far away from enough to optimize Windows 10 for better performance on your laptop. One reason your Windows 10 laptop running slow is caused by too many needless startup programs.
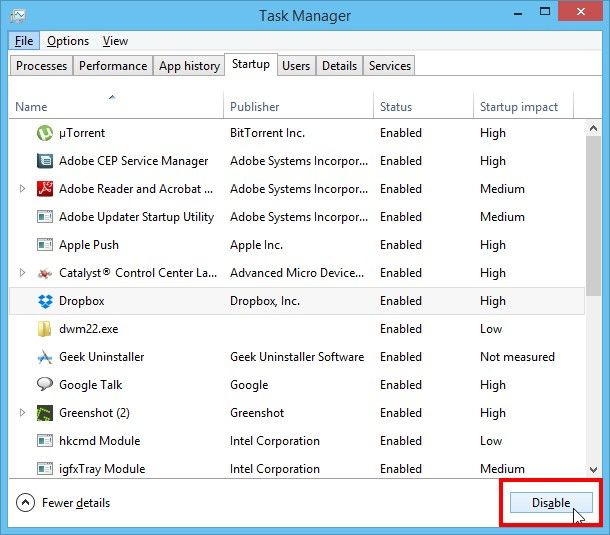
- 1. Press Ctrl-Alt-Delete on your key board and choose Task Manager from the menu bar. Or right click the lower right corner of your screen to bring up Task Manager.
- 2. Go to Startup option, where you can find all items that going to run at startup. Disable the applications from launching when starting up.
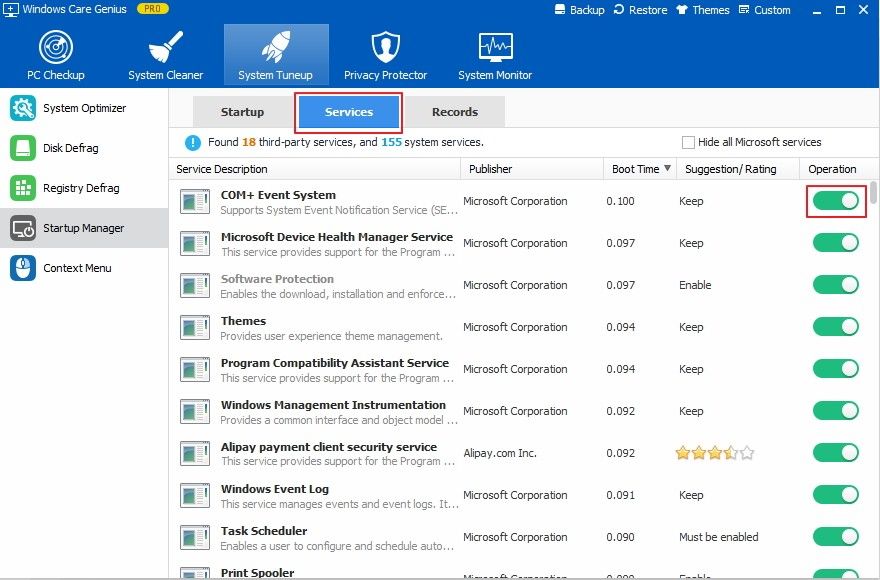
If you barely know which programs can be blocked, Windows Care Genius will provide you with professional assistance to turn off both unnecessary boot activities and backstage services to boost Windows 10 laptop startup speed.
To Disable Startup Programs and Windows Service Unused with Windows Care Genius:
Install and launch Windows Care Genius, and go to System Tuneup > Startup Manager. There you can refer to the software rating and other user’s reviews to get more detailed information about whether to disable it or not. Turn off the items by clicking Operation. You can also withdraw the actions on Records.
3. Free up Drive Space on Windows 10 Laptop
You can find some options on Windows 10 laptops to free up disk space, but the truth is that only a few files can be found and deleted. With Windows Care Genius, you can have a thorough and comprehensive cleanup for your laptop within 1-click.
Windows Care Genius enables you to:
- 1. Remove invalid Registry files off laptop
- 2. Erase junk files and temporary caches on each specific hard drives
- 3. Clear downloaded installation files, empty folders, IME, sample files
- 4. Find and delete useless bulk files
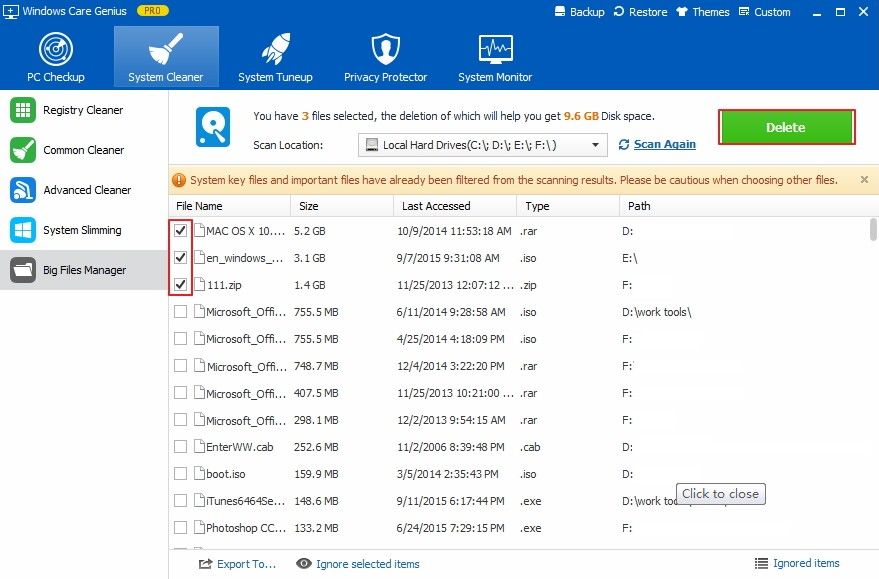
You can pick any of 5 powerful built-in tools to free up the memory based on your need.
4. Check and Remove Virus and Spyware from Your Laptop
Viruses, malware, spyware, etc., will definitely slow down your windows 10 laptop, occupy memories, corrupt your files, and what’s worse, illegally steal your personal information. You may not keep the pop-up ads, bloatware, plug-in installation package or else in mind, but these are signs you’re your laptop may be infected by adware and spyware. It’s wise to regularly check up the security of your laptop and remove the virus and spyware once detected. Windows Care Genius can easily help get this job done and always keep laptop at high performance.
- 1. Launch the system care software and choose PC Checkup to start scanning the health status of your Windows 10 laptop. You PC will automatically be rated from 10 to 0.
- 2. The scanned junk files, viruses, traces will be listed. Click Fix to optimize Windows 10 performance.
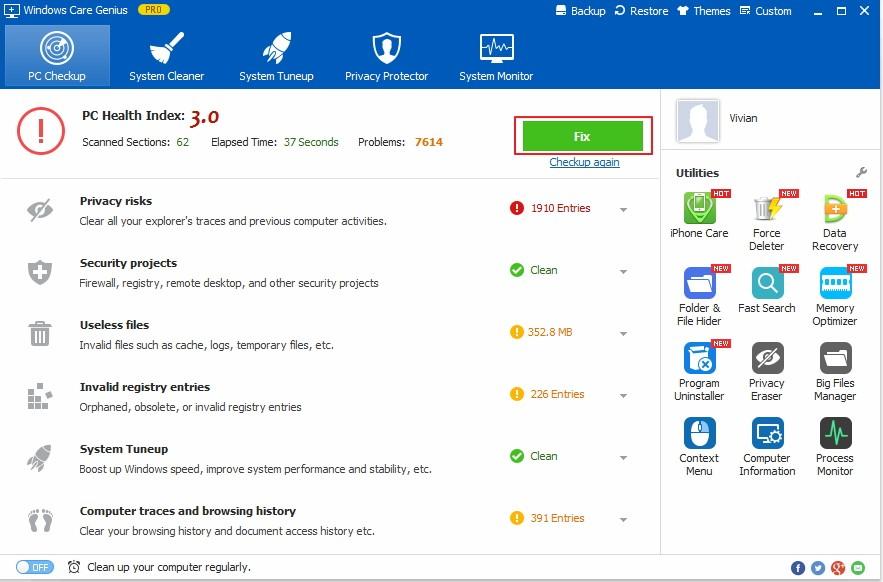
On the lower left corner you can set regular cleanup plan by type, day, and specific time.
5. Add More RAM to Laptop Windows 10
If you laptop doesn’t have enough physical memory, it will start to swap data to your hard drive or SSD, which will make the laptop perform sluggish. Adding more RAM can solve the problem. The first thing you need to figure out is how much memory you have now to see how much more memory will you need. Usually, moving from 4GB to 8GB (the most common upgrade plan) costs between $25 and $55, depending on whether you need to buy the whole amount or just add 4GB more.
Right click Start Menu to open hidden contents. Put your cursor to System or find My Computer > Properties to check the RAM on windows 10.
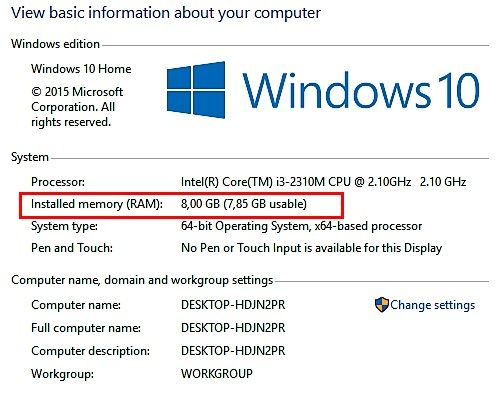
Then you have to make sure what kind of memory bank you are using. Is it DDR, DDR2, DDR3 or DDR4? You won’t be able to install one kind of memory stick in a slot meant for different type, let’s say, DDR won’t fit in slots designed for DDR2 or DDR3. You can find a lot of tutorial videos online to teach us how to add RAM in laptop. Here I won’t give the details.
Hope these methods works for you to boost laptop performance Windows 10. You might as well try Windows Care Genius to find more surprise.
- Related Articles
- Free Game Booster/Optimizer for Windows 10/8/7
- How to Cleanup PC after Windows 10 Upgrade and Regain Disk Space
- Forgot My Windows 10 Password, Top 5 Ways to Recover It
