Top 5 Ways to Fix Windows 10 Settings Won’t Open
Top 5 Ways to Fix Windows 10 Settings Won’t Open
If you are a new Windows 10 user then a lot of things may seem new to you. Windows 10 is really a great development in the history of Microsoft, so it’s a really amazing thing to be a Windows 10 user. But recently there is an issue with Windows 10 that the settings option won’t open. Sometimes when you try to open the settings option, Windows launches the store! If you can’t open Windows 10 settings in your PC, then you have come to the right place. This article will give you the best 5 ways to solve your Windows 10 settings not working issue in a very easy and step by step guideline. So keep reading till the end.
Way 1: Fix Windows 10 Settings not Opening Using Microsoft Troubleshooter
Way 2: Fix Windows 10 Settings not Working Using SFC scan
Way 3: Install Necessary Windows Update
Way 4: Create a New User Account
Way 5: Reset Your Windows 10 PC
Way 1: Fix Windows 10 Settings not Opening Using Microsoft Troubleshooter
If your Windows 10 settings is not opening, then you can easily fix it using Microsoft Troubleshooter. Here is how to do it:
1. First you need to click here and download the Troubleshooter.
2. Now run the troubleshooter to check if the issue resolves or not.
3. Now press “Windows+X” and select “Command Prompt (Admin)” option.
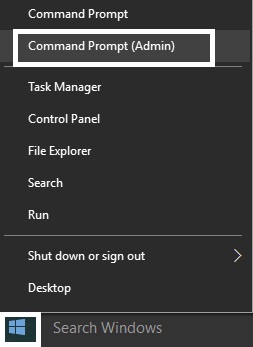
4. No type the below command in the box and press “Enter” in your keyboard.
wuauclt.exe /updatenow
5. Now wait for the update process to start. If it doesn’t start automatically, try the command for few more times.
6. Finally restart your PC to save the changes completely. Your issue should be resolved now.
Way 2: Fix Windows 10 Settings not Working Using SFC scan
If Microsoft Troubleshooter doesn’t work for solving windows 10 settings issue, then you can use SFC scan to solve it. Here is how to use SFC scan and fix Windows 10 settings not working issue:
1. First you need to press “Windows+X” and select “Command Prompt (Admin) option”.
2. Now type “sfc /scannow” when Command Prompt opens and press “Enter”.
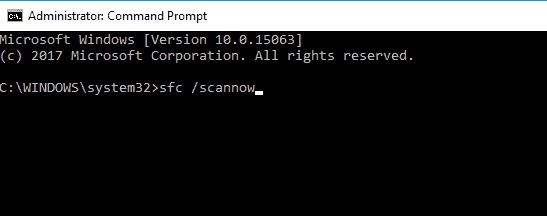
3. Now the scanning process will start. This can take 10 minutes or more so don’t try to interrupt it and keep patience till the process ends.
4. After the process finishes, check if the problem is solved or not.
Way 3: Install Necessary Windows Update
If you are facing Windows 10 settings not opening issue, then it may simply be resolved by installing some necessary Windows updates. Actually Windows is always set to download and install necessary updates automatically by default. But if you have turned it off somehow, you need to check if you have missed to install any necessary updates in your Windows 10 or not and download and install all necessary updates immediately. Here is how to do it:
1. You need to open Control Panel at first. Click on the “Windows” button and search for “Control Panel” on the search box. Now select Control Panel from the list of results.
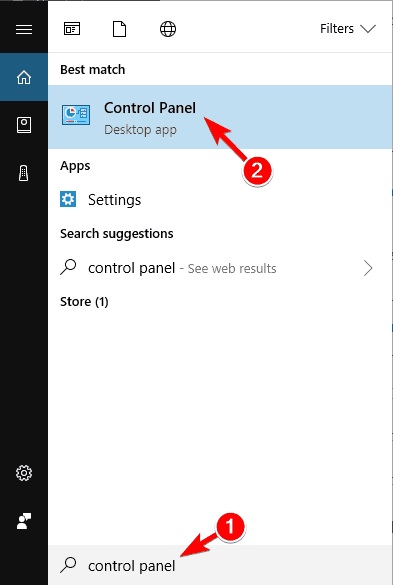
2. Now search for “Windows Updates” by typing it in the search box on the top right corner. Now click on “View Installed Updates” just like below image.

3. Now check for the update that is named as - KB3036140 and install it, if it’s not installed already.
4. After successfully installing this update, restart your PC.
5. Now check if the problem is solved or not after your PC restarts.
Way 4: Create a New User Account
If you are looking for a simple way to fix Windows 10 settings won’t open issue, then you can just create a new user account. Here is how to do it:
1. Open Control Panel just like the previous step. Click on the “Windows” button and search for “Control Panel” on the search box. Now select Control Panel from the list of results.
2. Click on “User Account” from the list of options.

3. Now click on “Manage another account” option like below image.
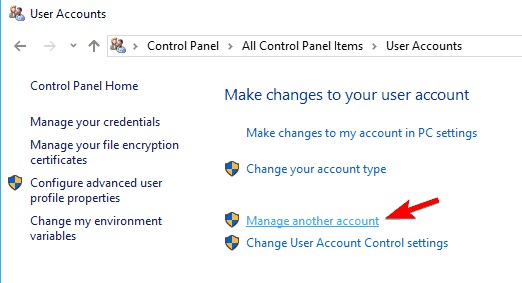
4. Now click on the “Add new user” button from below.
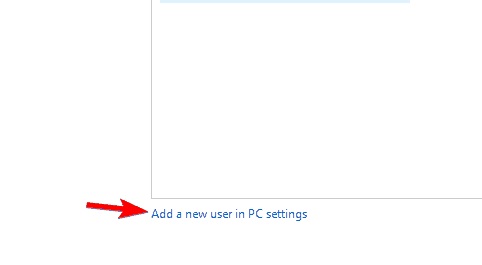
5. After creating a new user account in your Windows 10 PC, restart it. Check if everything is okay or not before restarting.
6. Now log in with the new user account that you have just created and check if your problem exists anymore or not.
Way 5: Reset Your Windows 10 PC
If any of the above ways are not working in your PC, then the final solution is resetting your Windows 10 PC. But this will remove all of your files from the system drive so use this method only if any of the previous ways don’t work. Before resetting your PC, make sure to create a backup. Here is how to reset your PC:
1. First open the “Start” menu, click on the “Power” button, press and hold the “Shift” key and select “Restart” from the menu.
2. You will get 3 options in this part. Select “Troubleshoot”, then “Reset this PC” and finally click on “Remove everything”.
.jpg)
3. Now you will be asked to insert a Windows 10 installation media to proceed to the next step. SO make sure that you have it ready.
4. Now select the version of Windows and click on “Only the drive where Windows is installed” and then “Just remove my files”.
5. Finally click on the “Reset” button to start the process.
6. You need to follow the instructions that you will get on your screen to completely finish the resetting procedure.
7. After the whole process is finished, move the files from your backup and install the software that you need in your PC.
You can simply follow any of the 5 ways you like and your problem will be solved instantly. If you are facing any kind of Windows 10 booting issue in your PC then you can blindly trust on Windows Boot Genius. This useful and amazing tool will help you to easily solve all computer boot issues and also help you with some other great solutions.
- Related Articles
- Top 6 Ways to Fix Blue Screen on Windows 10
- Top 5 Ways to Fix Screen Flashing or Flickering on Windows 10
- How to Disable Windows 10 Fast Startup
