A Full Guide on Windows 10 Color Management
A Full Guide on Windows 10 Color Management
Windows 10 operating system is a piece of art itself. There are many colors used on the desktop to make it look more attractive. Sometimes, the changes in the color settings Windows 10 sour the feel of the display. It is essential to change screen color Windows 10 back to normal or to set it the desired configuration for the users who are connected with photography, video editing or gaming. This article dictates all the possible information about Windows 10 color management.
Part 1. How to Open Color Management on Windows 10?
Part 2: How to Download the Right Color Profile for Your Monitor on Windows 10?
Part 3: How to Install the Right Color Profile for Your Monitor on Windows 10?
Part 4: How to Restore Default Color Settings in Windows 10?
Part 1. How to Open Color Management on Windows 10?
Whenever the question of how to change screen color on Windows 10 comes to mind one of the solutions to this issue is to open color management on Windows 10. There are various methods to open the color management on Windows such as
1. Through search:
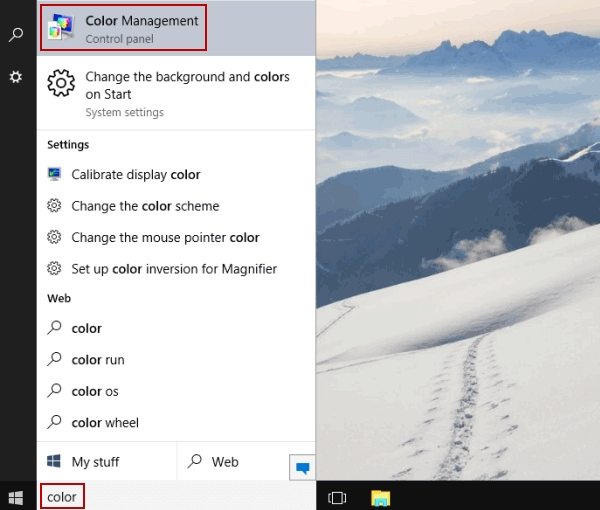
a. Click on search in the bottom left corner of the desktop.
b. Type in "color" in the search box and search.
c. Click on "Color Management" from the from the search results to open the same.

2. Via command prompt:
a. Launch command prompt.
b. Type in the following command "colorcpl.exe" in the prompt.
c. Press "Enter" from the keyboard to launch color management.

3. By using Run:
a. Launch "Run" box by pressing "R" from the keyboard along with Windows key.
b. In the "Run" box type in "colorcpl"

c. Click on "OK" or press "Enter" from the keyboard to open color management.
4. Via control panel:
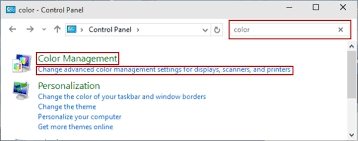
a. Launch control panel first.
b. Locate the empty search box on the top right corner of the panel window.
c. Type in "color" and search.
d. Choose either of "Color Management" or "Change advanced color management settings for displays, scanners, and printers" to launch the color management.

5. By PowerShell:
a. Launch Windows PowerShell from the start menu or any other relevant method.
b. Type in "colorcpl" in it.
c. Press "Enter" from the keyboard to open color management.
Part 2: How to Download the Right Color Profile for Your Monitor on Windows 10?
To change screen color Windows 10 first the information about the correct color profile is required. A color profile can be described as a data set that controls the colors to be displayed by the OS. The correct color profile is therefore essential to get the proper experience of color in the images, videos or games. The color profile can be found on the internet. There are only two ways to find them. Follow these steps to download and install proper color profile on the PC.
Way 1: Via the display manufacturer's website
1. Look for ICC or ICM file on the manufacturers' web page.
2. Go to the download page to download the right .ICC or .ICM file for the PC. The file may also be provided in a .zip file along with some other useful files.
Way 2: Via some enthusiasts website
1. Make a Google search for the .ICC or.ICM file
2. While searching, put the model name and number of the monitor in the search keywords too so that it can give the suitable results.
Some companies emphasize the fact that the .ICC files should be used with the OSD settings of the display. The color may also look different based on the specifications of the graphics card.
Part 3: How to Install the Right Color Profile for Your Monitor on Windows 10?
After the download of the .ICC or .ICM file is done now comes the part of installing the same. Follow these steps to install the files in the PC properly:
1. Search for "Color Management" in the search box.

2. Click on the relevant search result to launch the color management shortcut.
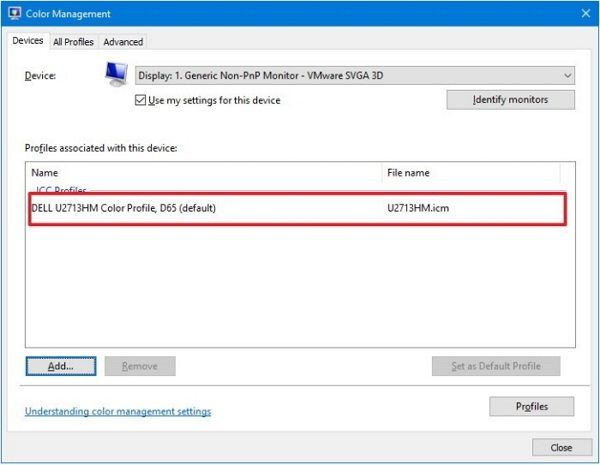
3. If the set up contains more peripheral system than monitor only viz. printers, scanners, etc. Then choose the device within the "Device" box for which the files are to be installed. Otherwise, the software will automatically select the only display connected to the PC.
4. After selecting the device tick the box beside the option "Use my settings for this device" below the name of the device.
5. Locate the box beside the option "Add" and check it to add new .ICC or .ICM files to the PC.
6. A list of all the .ICC or .ICM files available in the PC will come up in the screen. Double-click the .icm file to install the new profile. Click Close to complete the task.

Part 4: How to Restore Default Color Settings in Windows 10?
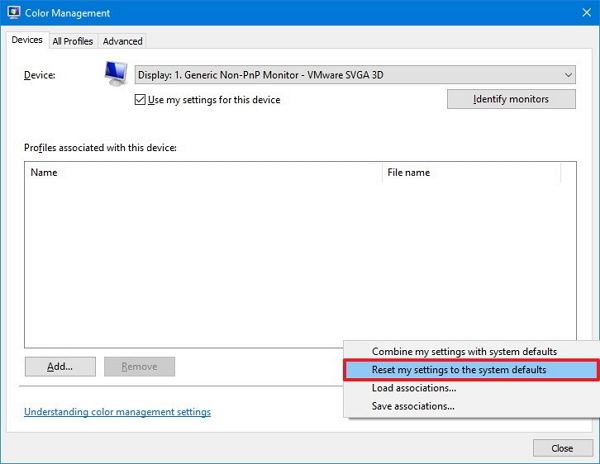
Sometimes the .ICC or .ICM files do not make the color management better; on the contrary, it may make the situation worse than before. To handle this kind of situation the user should know how to restore default color settings in Windows 10. Follow these steps to restore the default settings:
1. Make a right click on the "Start" icon.
2. From the drop-down menu choose "Control Panel'.

3. Within the control panel locate the "Appearance and Personalization" section.
4. Click on "Change the Theme" option there.
5. Click on "Windows" within the "Windows Default Themes section" region.

Except for color management of the display, there are other problems like forgetting the password, which makes people suffer a lot. However, with the use of a simple tool named 4WinKey, one can easily deal with issues of lost password of WINDOWS 10 PC.
- Reset/Remove Windows admin and other user password for local/domain account.
- Create a new local/domain admin account to unlock your computer.
- Change your Microsoft account password offline.
- Fully support Windows 10/8.1/8/7/Vista/XP, Windows Server 2012 (R2)/2008 (R2)/2003 (R2).
- Related Articles
- How to Disable Windows 10 Fast Startup
- Windows 10 Keeps Asking for Login User Password, How to Fix It
- Windows 10 Password is Incorrect, How to Fix it
