How to Fix Face-Recognition (Windows Hello) Not Working after Windows 10 Update
How to Fix Face-Recognition Not Working After Windows 10 Update
Face-recognition is a super convenient feature that allows users to securely log in to their computers simply by looking at their device. It is one of the three available options that are bundled with the Windows Hello feature. The other two being, fingerprint and iris scan. The reason behind face-recognition is a no-brainer. Popular as the feature is, some users have complained that it stopped working after they updated Windows 10. This article outlines simple, straight-forward solutions of fixing Face-recognition (Windows Hello) not working after Windows 10 update.
Method 1: Update Drivers
It is possible that facial recognition isn’t working because the corresponding drivers are outdated. Follow the procedure below to fix this issue by updating drivers.
Step 1: Launch Device Manager by pressing Windows button and X key simultaneously and select Device Manager.
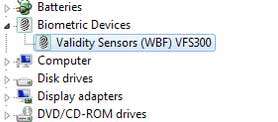
Step 2: Click Biometric Devices, right-click the device and select Uninstall.

Step 3: Click the “Action” menu in the top bar and select “Scan for hardware changes”.
Windows will find and update the camera drivers.
Method 2: Enable Biometrics Via Local Group Policy Editor
Windows 10 facial recognition not working can easily be fixed by enabling biometrics. The reasoning behind using this method is that when updating Windows 10, a couple of system settings e.g. the Local Group Policy, could have been altered. This might have caused the malfunction of facial recognition.
Step 1: Launch the Run command by hitting the Windows key + R button on your keyboard.
Step 2: Type “gpedit.msc” then press Enter. This command opens the Local Group Policy Editor.
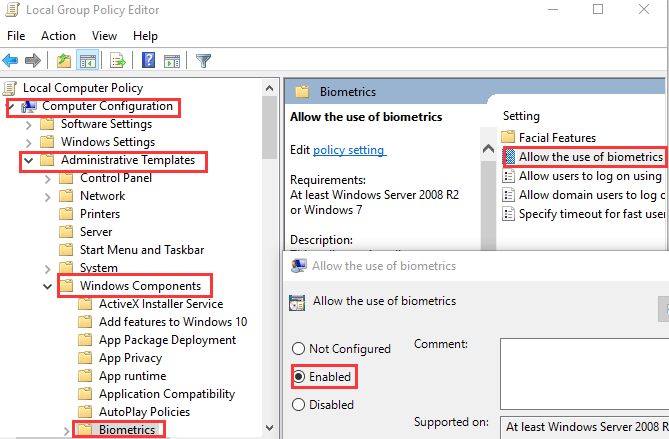
Step 3: Click Computer Configuration > Administrative Templates > Windows Components > Biometrics.
Step 4: Click “Allow the use of biometrics” setting.
Step 5: Check the “Enabled” option.
Step 6: Click “Apply” then “Ok”.

Step 7: Click “Allow users to log on using biometrics”, click “Apply” then “Ok”.
Step 8: Reboot your computer.
Method 3: Rollback Camera Drivers
If Facial Recognition was working perfectly before the update, you could simply roll-back the settings by following the procedure below.
Step 1: Launch Device Manager by right-clicking the Start menu and selecting it.
Step 2: Click System Devices > Surface Camera Windows Hello.
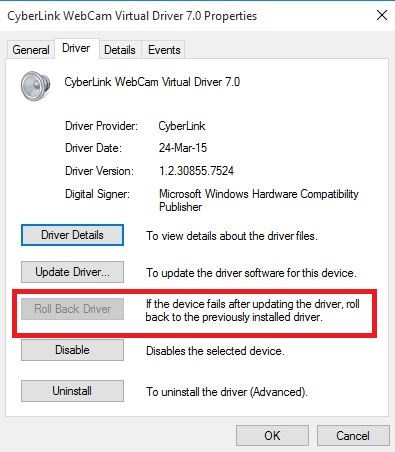
Step 3: Click the “Driver” tab then click the” Roll Back Driver” button.

Step 4: Select the driver that worked previously.
Step 5: Apply and save the changes then reboot the computer.
Method 4: Reset Facial Recognition Settings
Step 1: Launch the Settings app by clicking the Start Menu then the gear icon, or by simultaneously pressing Windows + I.
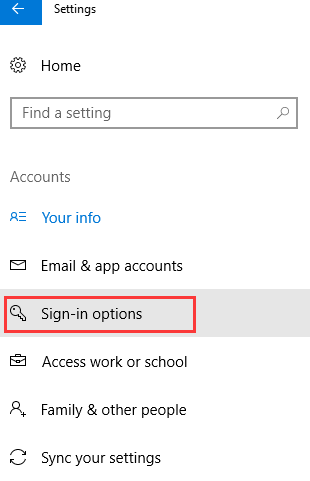
Step 2: Click Accounts > Sign-in Options.

Step 3: Navigate to Facial Recognition and click “Remove”.
Step 4: Click “Get Started” and follow the prompts to reset the feature.
Step 5: Restart your computer.
Conclusion
The methods above show just how simple it is to fix Windows Hello not working after Windows 10 Creators Update. You can also change to the PIN or password to sign into your computer if for some reason Hello is not available or is having trouble recognizing your face. If you have forgotten your password, Windows Password Key is a beautifully designed and simple tool that allows you to reset or recover lost passwords for both standard and admin users in Windows 10.
- Related Articles
- Top 8 Ways to Fix High RAM and CPU Usage of Windows 10
- Top 2 Ways to Downgrade from Windows 10 to Windows 7 on Dell Computer
- Top 4 Methods to Fix Windows 10 Login Takes Forever
